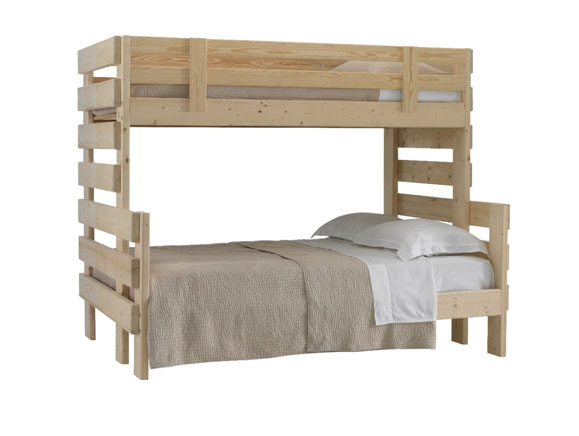
Parts List
2 – Ladder Rung Ends
2 – Bed Rails with Safety Rail attached
2 – Bed Rails
12 – Bed Slats. Approx. 38-3/8”L x 3-1/2”W
9 – Bed Slats. Approx. 54-3/8”L x 5-1/2”W
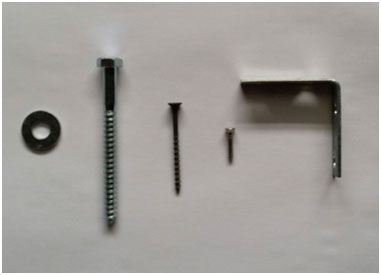
16 – 5/16” washers
16 – 5/16” x 3-1/2” lag screws
42 – 2” sheet-rock screws
4 – 2 x 2 x 1/2” Corner Braces with 16 – ¾” screws
Tools Necessary for Assembly
You will need a Ratchet with ½” Socket, a Phillips Head Screw Driver & a drill with a #2 Phillips Head Bit for the assembly of this bed.
Please read through ALL of the instructions carefully before starting. If you are not able or capable of understanding these written instructions for the assembling of this bed, seek the help of someone who can understand them. This bunk bed requires two adults for the assembly. Before starting assembly, check to see that you have all parts necessary. Do not discard any materials until assembly is complete.
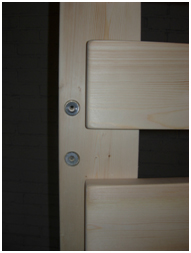
Find eight 5/16” washers. With one adult holding a Ladder Rung in an upright position, the other adult places eight 5/16” washers into the eight pre-drilled holes on the left and right side of Ladder Rung, as pictured below.
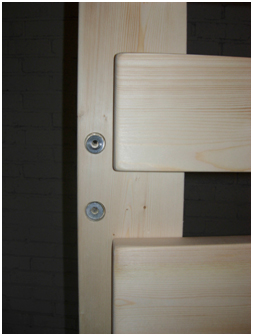
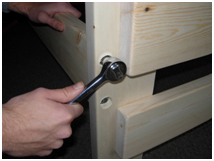
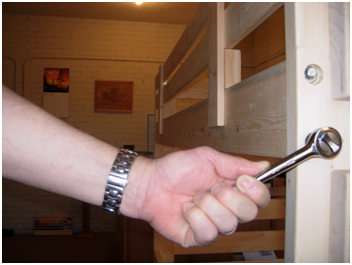
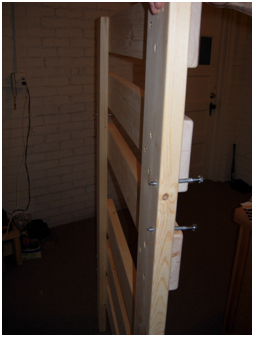 With one adult still holding Ladder Rung in an upright position the other adult now finds eight 5/16 x 3-1/2” lag screws and the ratchet with ½” socket, and then screws those eight 5/16 x 3-1/2” lag screws through the eight pre-drilled holes where the eight washers were placed. You will want to screw the lags through those holes so that approximately 3/8” of the lags are sticking through the other side. (see the picture right)
With one adult still holding the Ladder Rung in an upright position, the other adult now finds a Bed Rail and with the ratchet and ½” socket attaches one end of the bed rail to bottom back of Ladder Rung. (see picture below)
Find other Ladder Rung. With one adult holding the Ladder Rung in an upright position, the other adult places eight 5/16” washers into the eight pre-drilled holes on the left and right side of Ladder Rung. (see picture below)
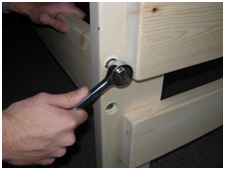
With one adult still holding Ladder Rung in an upright position the other adult now finds eight 5/16 x 3-1/2” lag screws with the ratchet and ½”socket, screws the eight 5/16 x 3-1/2” lag screws through the eight pre-drilled holes where the eight washers were placed, and just as before screws the lags through those holes so that approximately 3/8” of the lags are sticking through the other side. (see the picture below.
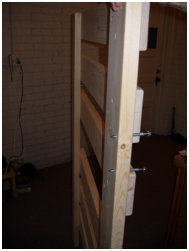
The adult holding the Ladder Rung aligns the two bottom back holes of that ladder rung to Bed Rail and the other adult with ratchet and ½” socket attaches Ladder Rung to Bed Rail (see the picture below)
Find Bed Rail with Safety Rail. Both adults hold and align each end of this rail to the screws on the upper back side of Ladder Rung and other Ladder Rung. One adult with the ratchet and ½” socket attaches one end of the rail to the upper back side of Ladder Rung while the other adult holds the rail in place. After the one side is attached and the other adult is still holding the rail in place, go to the other side and attach rail to Ladder Rung. (see pic. below)
Find Bed Rail. Both adults hold and align each end of Bed Rail to the screws on lower front side of Ladder Rung and Ladder Rung, one adult with ratchet and ½” socket attaches one end of the rail to lower front side to Ladder while the other adult holds the rail in place. After the one side is attached and the other adult is still holding the rail in place, go around to the other side and attach the rail to Ladder Rung. (see the picture below)

Find Bed Rail with Safety Rail. Both adults hold and align each end of this rail to the screws on the upper front side of Ladder Rung and other Ladder Rung. One adult with the ratchet and ½” socket attaches one end of the rail to the upper front side of Ladder Rung while the other adult holds the rail in place. After the one side is attached and the other adult is still holding the rail in place, go around to the other side and attach the rail to Ladder Rung. (see pic. below)

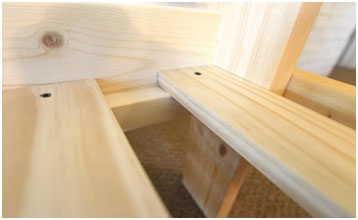
Find the package of four Corner Braces with screws. Using the small screws in the package, screw the corner braces to the top inside safety rail and inside corner post in each corner. (see the picture below). Use only two screws at each corner, see picture.

Find the bundle of 12 bed slats. Here you will need your Phillips Head screw driver/drill. When opening the bundle of slats you’ll notice on each end on the slats the pre-drilled holes, the holes are for you to securely screw the slats to the cleats. Start at one end of top bunk, one slat at a time screw each slat to the side of the line marked with an “X”. When finished with the 12 slats for the top bunk, perform the same steps for bottom bunk with the bundle of 9 larger slats for the Full Bed on bottom.
Now that the Bunk Bed is assembled, check your work. Walk around the bed to make sure your work is secure and complete. Make sure all lag screws are screwed in as should be, safety rails are secure, and slats are fastened to cleats.
Safety Warnings
- Follow the information on the warnings appearing on the upper Bunk and structure. Do not remove warning label from bed.
- There must be at least 5” from mattress sleeping surface to top edge of safety-rail
- Always use the recommended size mattress or mattress support, or both, to help prevent the likelihood of entrapment or falls (see the section titled “Mattress Parts”).
- Do not allow children under 6 years of age to use the upper bunk.
- Prohibit more than one person on the upper bunk.
- Periodically check and ensure that the safety rails, ladder-rungs, and other components are in their proper position, free from damage, and that all connections are tight.
- Do not allow horseplay on or under the bed and prohibit jumping on the bed.
- Always use the ladder-rung on the ends for entering and leaving the upper Bunk.
- Use of a night light may provide added safety precaution for a child using the upper bunk.
- If the bunk bed will be placed next to a wall, the safety rail that runs the full length of the bed should be placed against the wall to prevent entrapment between the bed and the wall.
- Always use the safety rails on both long sides of the upper bunk.
- The use of water or sleep flotation mattresses is prohibited.
Mattress Parts
This bed is designed to use a mattress that is 37½” – 38½”W and 74 – 75”L on the upper bunk and a 12 piece Slat Kit (included). Total thickness must not exceed 9 – ¾”. The bottom bed (Full Bed) is designed to use a mattress that is 53 ½” – 54 ½”W x 74”- 75”L and a 9 piece Slat Kit (included).
Keep these instructions for future reference.
Strangulation Hazard – Never attach or hang items to any part of the bunk bed that are not designed for use with the bed; for example, but not limited to, hooks, belts, and jump ropes.
